Secure Your Ubuntu Server: A Complete 2025 Guide
Ubuntu is one of the most popular Linux distributions, widely used on web servers, cloud instances, and enterprise systems. Its user-friendliness and robust performance make it a top choice for developers and sysadmins alike. However, security is often overlooked during initial setup, leaving systems vulnerable to attacks.
In this in-depth guide, you’ll learn step-by-step how to secure your Ubuntu server—whether you’re using it for hosting websites, applications, or cloud services. This article covers everything from basic hardening to advanced threat prevention, suitable for Ubuntu 20.04, 22.04, and the latest 24.04 releases.
🛡️ Why Ubuntu Server Security Is Critical
With increasing cyber threats—ransomware, brute-force attacks, zero-day vulnerabilities—securing your server is not optional. A compromised server can lead to:
- Data breaches and leaks
- Defacement of websites
- Total service downtime
- Malware distribution
- Regulatory penalties (GDPR, HIPAA)
A well-secured server not only protects your data but builds trust and ensures service availability.
1. Keep Your Server Updated
Outdated software is one of the biggest security risks. Ubuntu provides frequent security patches that should be installed as soon as available.
Update Packages
1. Keep Your Server Updated
Outdated software is one of the biggest security risks. Ubuntu provides frequent security patches that should be installed as soon as available.
Update Packages
sudo apt update && sudo apt upgrade -y

Enable Unattended Upgrades (automatic updates)
sudo apt install unattended-upgrades
sudo dpkg-reconfigure –priority=low unattended-upgrades
Pro Tip: Enable kernel live patching using Canonical’s livepatch for critical updates without reboots:
sudo snap install canonical-livepatch

2. Use a Strong Password Policy
Use libpam-pwquality to enforce secure password rules.
sudo apt install libpam-pwquality
Configure /etc/pam.d/common-password:
password requisite pam_pwquality.so retry=3 minlen=12 ucr=-1 lcr=-1 dcr=-1 ocr=-1
This enforces:
Minimum 12 characters
At least 1 uppercase, 1 lowercase, 1 digit, 1 special char
3. Disable Root SSH Login
Allowing root login over SSH is a major vulnerability. Instead, use a non-root user with sudo privileges.
SSH config:
sudo nano /etc/ssh/sshd_config
Set:PermitRootLogin no
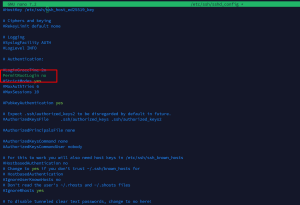
sudo systemctl restart ssh
4. Use SSH Key Authentication (Disable Password Login)
Use public-private key pairs for secure access instead of passwords.
Generate SSH Key:
On your local machine:
ssh-keygen -t ed25519
ssh--id user@your-server-ip
Disable password auth:
/etc/ssh/sshd_config:
PasswordAuthentication no
Restart SSH:
sudo systemctl restart ssh
5. Set Up a Firewall with UFW
UFW (Uncomplicated Firewall) is an easy way to manage iptables.
Install & Enable:
sudo apt install ufw
sudo ufw allow OpenSSH
sudo ufw enable
Common Rules:
sudo ufw allow 80/tcp # HTTP
sudo ufw allow 443/tcp # HTTPS
sudo ufw deny 23/tcp # Block Telnet
Check Status:
sudo ufw status verbose
6. Install and Configure Fail2Ban
Fail2Ban protects against brute-force login attempts by banning IPs after failed logins.
sudo apt install fail2ban
config:
sudo cp /etc/fail2ban/jail.conf /etc/fail2ban/jail.local
Example Configuration for SSH:
/etc/fail2ban/jail.local:
[sshd]
enabled = true
port = ssh
filter = sshd
logpath = /var/log/auth.log
maxretry = 5
Then:
sudo systemctl restart fail2ban
Check status:
sudo fail2ban-client status sshd
7. Install a Malware Scanner
Use ClamAV or rkhunter for malware and rootkit detection.
sudo apt install clamav clamav-daemon
sudo freshclam
sudo clamscan -r /var/www
rkhunter:
sudo apt install rkhunter
sudo rkhunter --update
sudo rkhunter --check
8. Remove Unused Packages and Services
Every service is a potential attack surface.
List and remove:
sudo apt list --installed
sudo apt purge apache2 samba cups
sudo apt autoremove
Also disable unneeded services:
sudo systemctl disable <service>
9. Secure Shared and Web Directories
If you host websites or apps, harden /var/www.
Set correct permissions:
sudo chown -R www-data:www-data /var/www/html
sudo find /var/www/html -type d -exec chmod 755 {} \;
sudo find /var/www/html -type f -exec chmod 644 {} \;
Use .htaccess to deny access to sensitive files:
apache
<FilesMatch "\.(env|git|sql|log)$">
Order allow,deny
Deny from all
</FilesMatch>
10. Create a Limited Privilege User
Don’t use root for daily tasks.
Add user:
sudo adduser sunil
sudo usermod -aG sudo sunil
Now use:
su - sunil
11. Enable AppArmor for Mandatory Access Control
AppArmor restricts program capabilities and improves defense against 0-days.
Install and enable:
sudo apt install apparmor apparmor-utils
sudo systemctl enable apparmor
Check profiles:
sudo aa-status
12. Enable Auditd for System Monitoring
Track system-level changes and detect anomalies.
Install:
sudo apt install auditd audispd-plugins
Start service:
sudo systemctl enable auditd
sudo systemctl start auditd
Log file: /var/log/audit/audit.log
13. Set Up a Private DNS and Block Ads/Trackers (Optional)
Use Pi-hole or AdGuard Home on internal network to block malicious domains.
Alternatively:
sudo nano /etc/hosts
Add:
127.0.0.1 malicious.com
14. Log Everything with Logwatch
Logwatch summarizes daily logs and emails you reports.
Install:
sudo apt install logwatch
Run:
sudo logwatch --detail High --mailto your@email.com --range today
15. Use a VPN for SSH (Advanced)
Using SSH over a VPN adds a second layer of encryption and makes brute-force nearly impossible.
Popular open-source options:
WireGuard: fast and modern
OpenVPN: highly configurable
Set up WireGuard:
sudo apt install wireguard
Follow server setup: https://www.wireguard.com/quickstart/
16. Harden the Kernel and sysctl
/etc/sysctl.conf to harden networking stack:

net.ipv4.ip_forward = 0
net.ipv4.conf.all.accept_redirects = 0
net.ipv4.conf.all.send_redirects = 0
net.ipv4.conf.all.rp_filter = 1
net.ipv4.icmp_echo_ignore_broadcasts = 1
Apply changes:
sudo sysctl -p
17. Enable 2FA for SSH (Optional but Recommended)
Install Google Authenticator or other PAM-based 2FA.
sudo apt install libpam-google-authenticator
google-authenticator
Enable PAM 2FA:
sudo nano /etc/pam.d/sshd
Add:
auth required pam_google_authenticator.so
And update SSH config:
ChallengeResponseAuthentication yes
Restart SSH:
udo systemctl restart ssh
18. Schedule Regular Backups
Security includes recovery. Use rsync, borg, or Duplicity.
rsync -aAXv /important/data/ /mnt/backup/
You can automate this with cron:
crontab -e
0 2 * * * /usr/bin/rsync -aAXv /important/data/ /mnt/backup/
19. Cloud & VPS Security Tips
If you’re using AWS, DigitalOcean, or other cloud platforms:
Disable password login at cloud-init
Configure security groups/firewall rules
Disable metadata API v1 (use IMDSv2 on AWS)
Restrict API tokens and rotate keys
Final Thoughts: Ubuntu Server Security Checklist
Here’s a quick recap of what you should implement:
✅ Keep system and packages updated
✅ Disable root login
✅ Use SSH keys
✅ Use UFW firewallc
✅ Install Fail2Ban
✅ Enforce strong password policy
✅ Remove unused packages and services
✅ Monitor logs and malware
✅ Harden kernel and SSH
✅ Schedule backups
✅ Use 2FA and VPN where needed
Security is a process, not a one-time setup. Review logs, update regularly, and follow best practices.
📈 Bonus Tip: Automate Your Security Audits
Install Lynis for automated security scanning:
sudo apt install lynis
sudo lynis audit system
🔚 Conclusion
Securing your Ubuntu server isn’t just for enterprises—it’s essential for anyone hosting services online. The steps in this guide provide a layered approach to server hardening, combining user access control, firewall rules, intrusion detection, logging, and more.
Whether you’re managing a small VPS or a fleet of servers, make this security checklist part of your deployment process. A few hours of setup today can prevent days or weeks of disaster recovery later.